11 Easy Knots for Boating
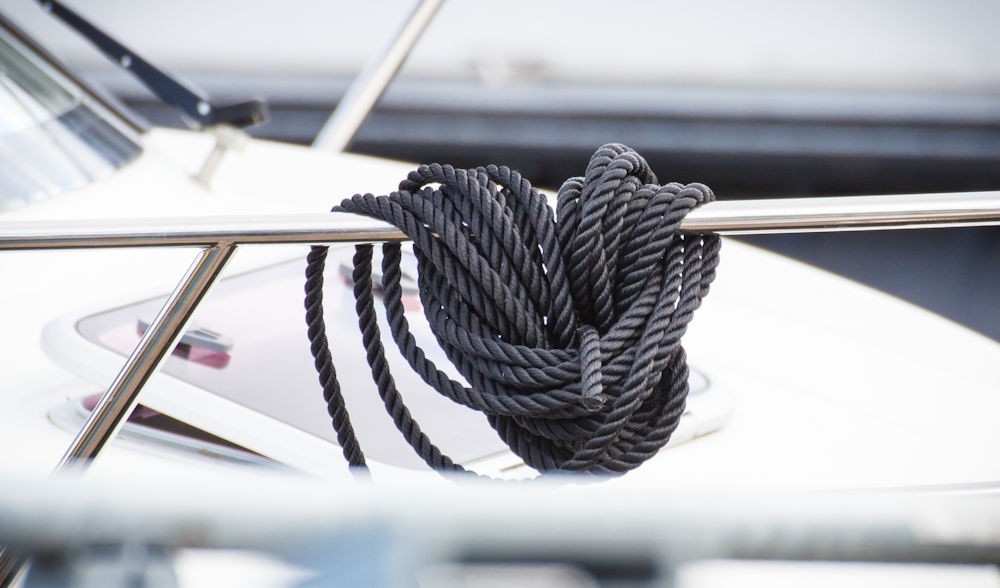
When it comes to boating equipment, there are many types of knots used for everything from securing line when mooring, handling heavy loads, towing and of course, adjusting your sails.
As boating experts at Van Isle Marina, we’ve narrowed it down to this list of 11 tied and true (pun intended) knots, hitches and bends. These knots will assist you with everything from anchoring to joining two different lines in a pinch. Armed with this basic knowledge, you can cast off with confidence.
Note: When in use, the end of a line is called the standing end. If hanging loose it’s known as the working end, sometimes referred to as the tail end.
The Knots
A knot is mainly used to secure a line to an object, like a piling. It is also used to form an eye, or a noose. Knots used at the end of a line can function as a stopper to keep the line from slipping away, a loop to fasten to an object, or to add weight to the line when tossing.
1. Bowline Knot
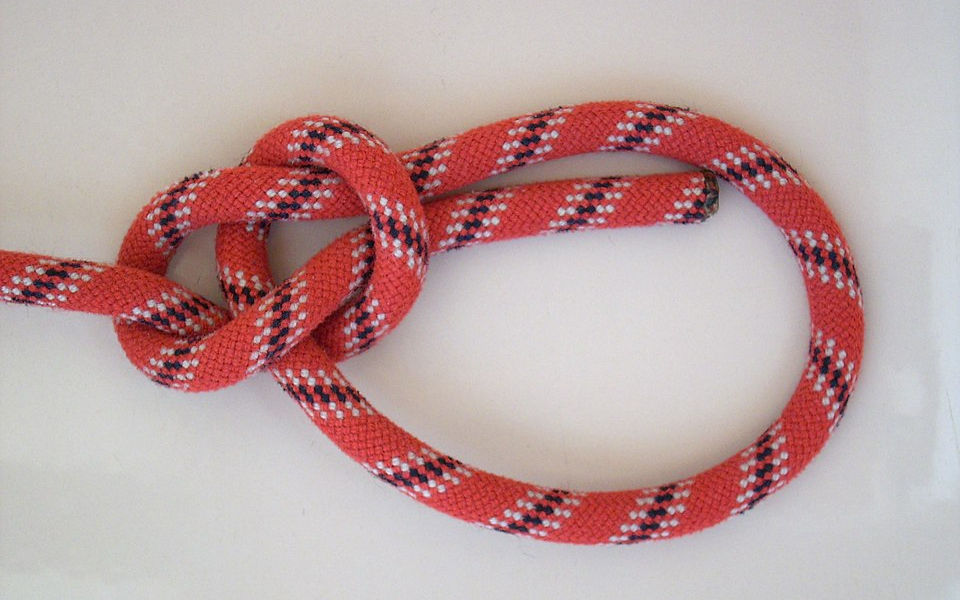
Photo credit to Markus Bärlocher, Wikipedia
The bowline is the most widely used in boating due to its versatility and reliability. A bowline forms a fixed noose at the end of the line and can also be used to connect two lines. The bowline is a go-to because it doesn’t slip and the knot can easily be untied, no matter how tight it has become. The bowline is a fundamental knot for boaters.
How to Tie a Bowline Knot
Make a loop in the line, with the working end over the standing end. The working end goes through the loop, around behind the standing end and back into the loop. To close the knot, pull tightly. To untie, turn the knot over and bend it downward to loosen it.
2. Figure Eight Knot
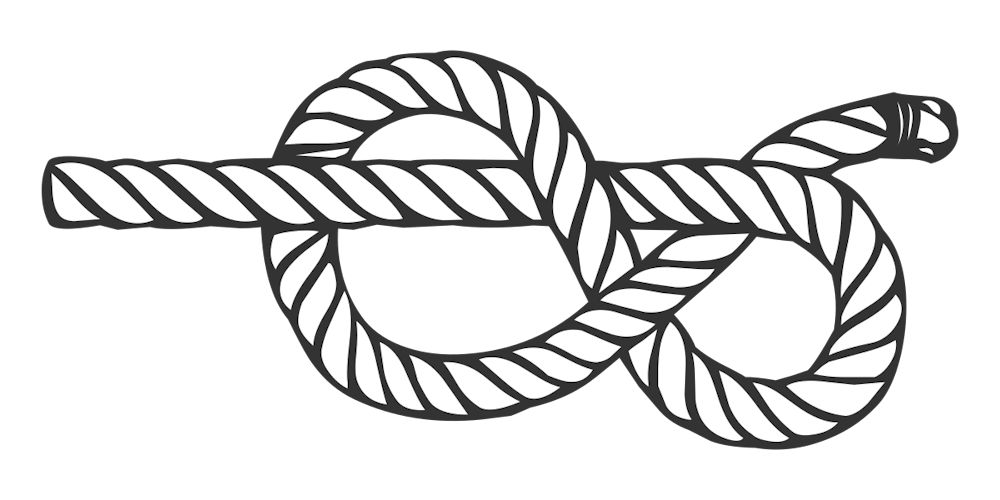
Photo credit to Lucasbosch, Wikipedia
The figure eight is used as a stopper knot that can easily be undone. Also reliable and versatile like the bowline, this know is widely used in boating and even rock climbing. It’s most often used to keep a line from sliding away and should never be used for bearing a load. It’s characterized by the number “8” formed in the line.
How to Tie a Figure Eight Knot
The figure 8 is a simple knot to tie – even for beginners. It’s easily untied too. Pass the working end over itself to form a loop then loop under and around the standing end. Finish the knot by passing the tail of the line down through the loop.
3. Heaving Line Knot
Photo credit to Jelebrun, Wikipedia
The heaving line knot is part of a family of knots that are excellent for weighing down the end of a line. The purpose of a heaving line is to make it easier to throw farther and keep under control. In boating, it may also be tied to the end of a messenger line, which can then be used to pull some larger rope.
How to Tie a Heaving Line Knot
Make a bight (loop) in the line and hold it so that it encloses the working end. Wrap the working end around the first two strands, then around all three to use up the line of the working end. Finish the knot by passing the working end through the loop.
4. Hitch Knot
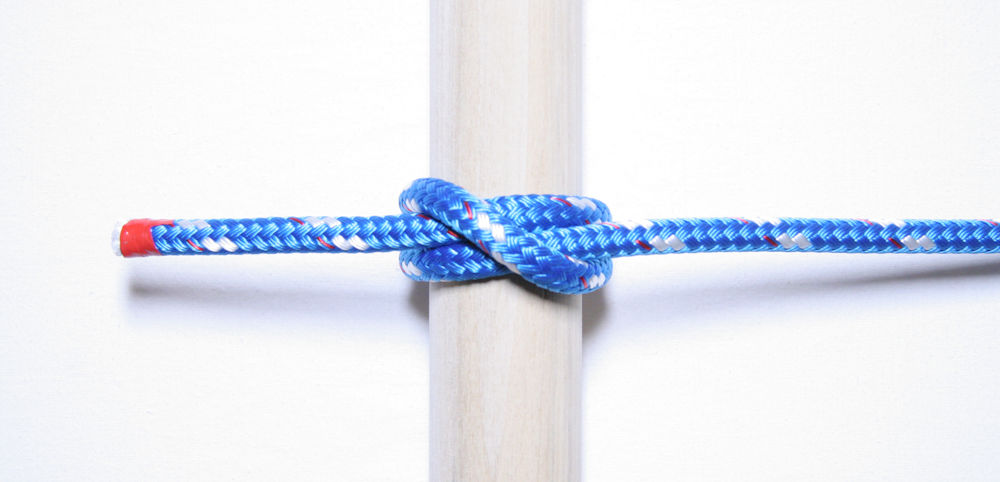
Photo credit to USCG PTC Developer, Wikipedia
A hitch is commonly used for tying line together (bending) or tying line to an anchor or a pile. These knots are unique because they can be easily tightened and released while maintaining strong slipping resistance. A well-tied hitch will hold tightly to whatever you need it to, and still untie quickly and easily.
How to Tie a Hitch
One of the more common hitch knots is a clove hitch. To tie one, first pass the running end of the line around the spar and back over itself to form an “X”. The running end can then be passed around again and under the intersection of the previous two turns. To finish, pull both ends tight.
5. Half Hitch
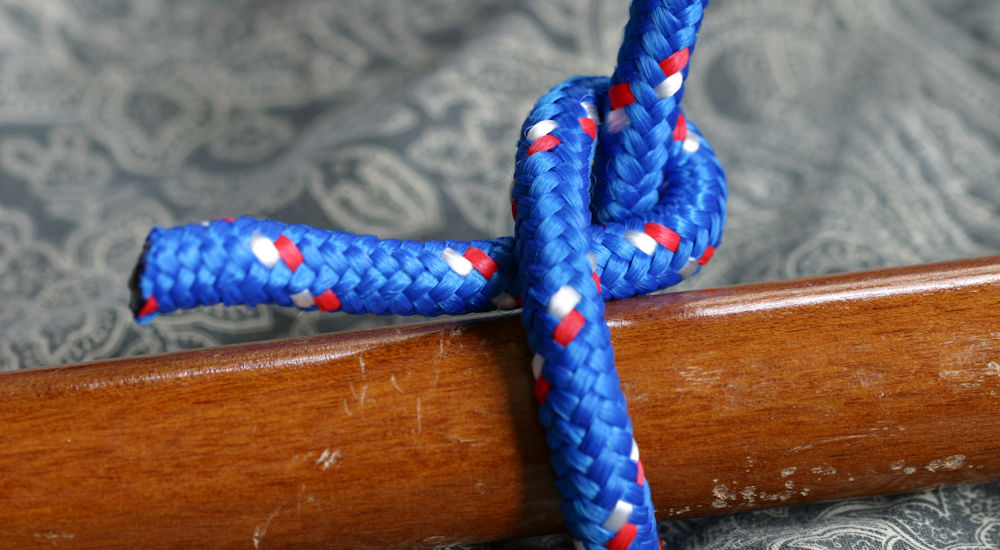
Photo credit to Wikipedia
The half hitch knot is a simple, primary knot used to temporarily bear loads as well as tie line around an object. It’s also used to finish many other hitches securely. It’s an easy knot to tie, but can be prone to slipping under strain, which means it’s not the best option for bearing heavy loads.
How to Tie a Half Hitch
Form a loop around the object you want to tie on to. Pass the end around the standing end and through the loop then tighten into the completed half hitch, which is designed to take a load on the standing end.
6. Anchor Hitch
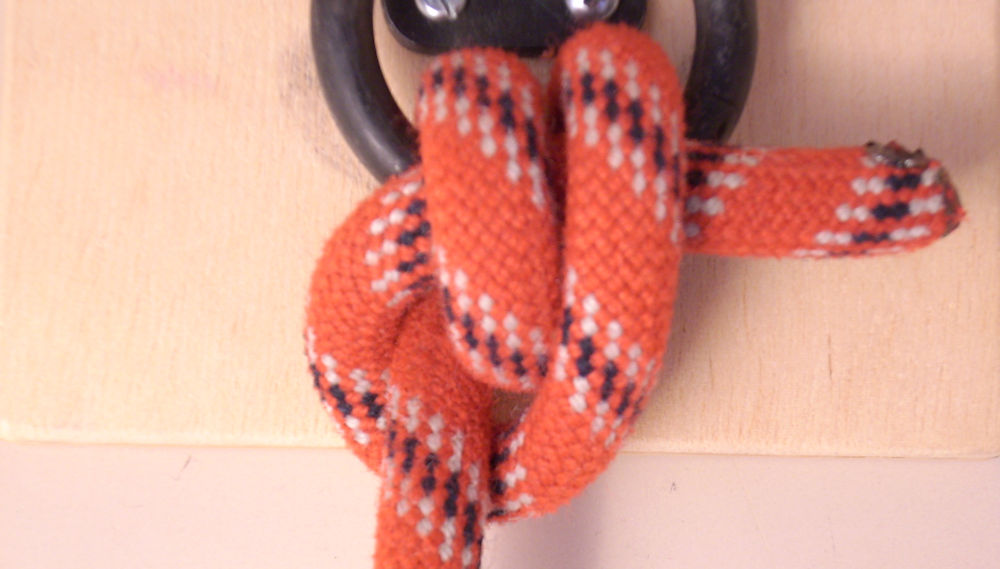
Photo credit to Markus Bärlocher, Wikipedia
Also known as the fisherman’s hitch, the anchor hitch is a versatile knot used for securing rope to an anchor or a different fixed object. It’s a reliable knot that’s sure to stay secure against an object, making it popular in boating and the arborist community.
How to Tie an Anchor Hitch
Pass the working end twice around the post keeping the second turn slack. Pass the working end over the standing end and under the original slack turn to tie the first half hitch. Pass the line around the standing end to tie a second half hitch and finish the knot.
7. Cleat Hitch
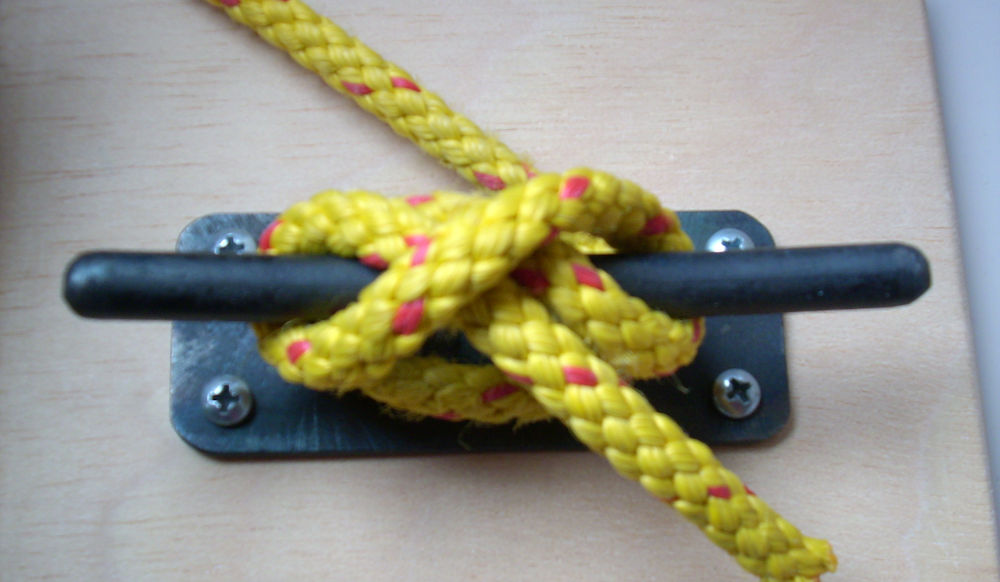
Photo credit to Markus Bärlocher, Wikipedia
The cleat hitch is a versatile knot used to attach line to a cleat, therefore securing a boat to a dock. In sailing terms, a cleat is a T-shaped piece of metal or wood to which ropes are attached. This knot is characterized by its ease of tying and untying, which is great for higher pressure scenarios like docking.
How to Tie a Cleat Hitch
Pass the line around the bottom horn of the cleat and then around over the top. Pull the line down across the middle and then up across the top again. Twist a loop in the line and hook it on the cleat as a half hitch.
8. Midshipman’s Hitch
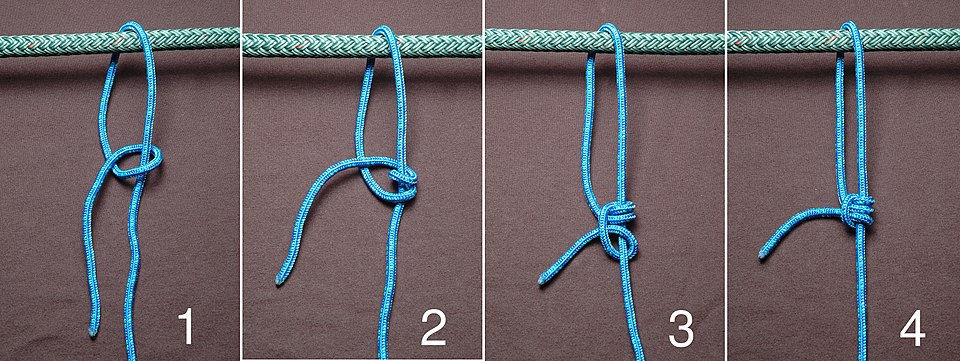
Photo credit to David J. Fred, Wikipedia
The midshipman’s hitch knot is a friction hitch that creates an adjustable loop at the end of the line. Even though the loop can be adjusted, when used in combination with a half hitch, it provides a secure hold. The knot also holds a strong load, making it useful for adjusting ropes and securing mooring lines.
How to Tie a Midshipman’s Hitch
Pass the working end around the standing end then pass it around again. Tuck it beside the first turn and pull tightly. Pass the working end around again and then tie a half hitch to complete the knot.
Bend Knots
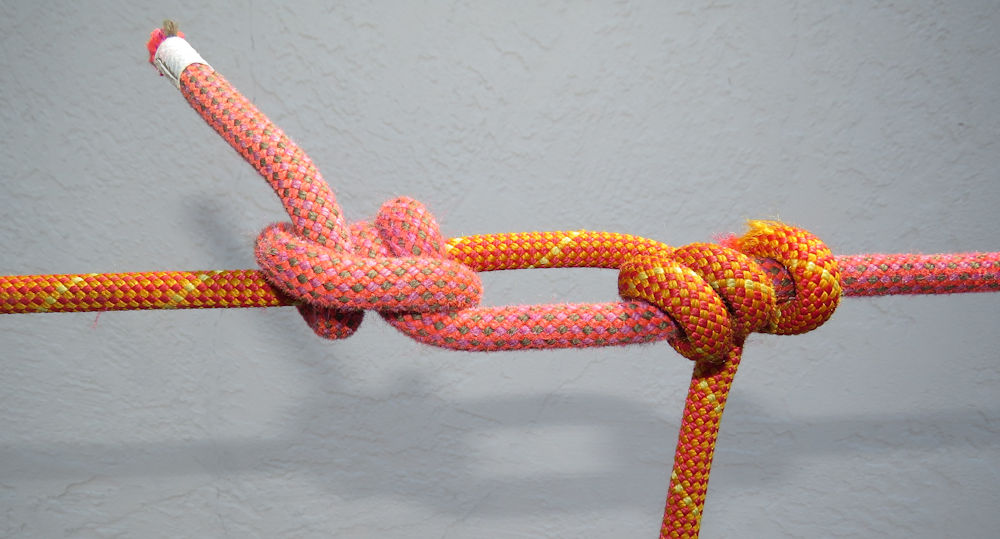
Photo credit to Hadron137, Wikipedia
The bend knot is used to join two ropes or lines together. In sailing terms, bend means “to join”. There are different bend knots available for different strengths and difficulty level of untying. The bend knot is widely used not only in boating, but for climbing and securing heavy loads on land.
9. Sheet Bend
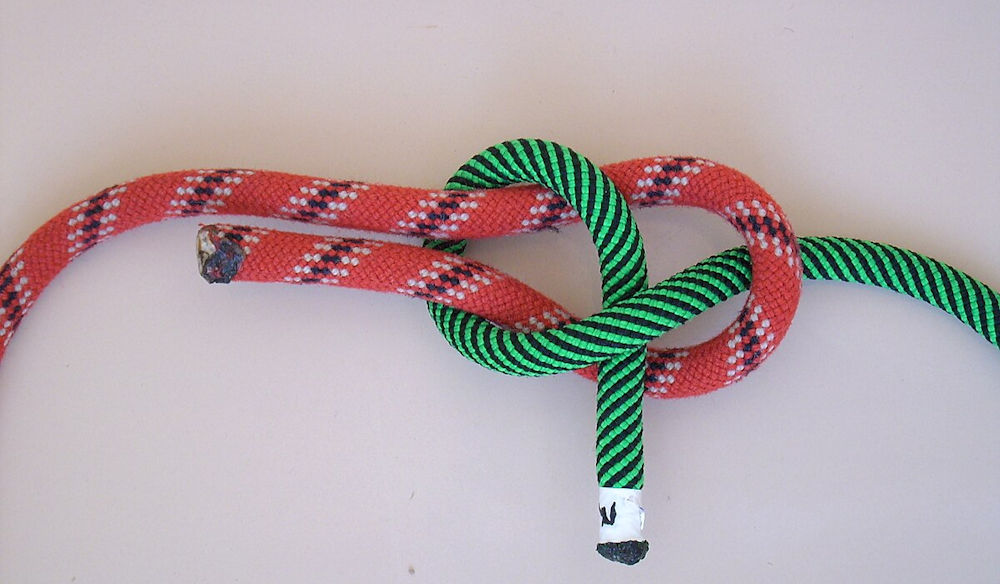
Photo credit to Markus Bärlocher, Wikipedia
The sheet bend knot works well for joining lines with different diameters, a common scenario in the boating world. This knot is relatively easy to tie and untie compared to others, and is pretty strong – enough to hold most loads.
How to Tie a Sheet Bend
Form a bight (loop) in the thicker line and hold it in one hand. Pass the thinner line through the bight and behind first the working end and then the standing end. Tuck the thinner line under itself to finish.
10. Alpine Butterfly Bend
Photo credit to Mark A. Taff, Wikipedia
Also known as the alpine butterfly loop, this bend knot is a versatile knot used when a secure loop is needed in the middle of a rope or line. Based on interlocking overhand knots, the alpine butterfly bend is used to join similar sized lines. It even looks a little bit like a butterfly, too!
How to Tie an Alpine Butterfly Bend
Join the two ends, then wind the line around your hand so the join is by your fingertips. Wind the line around your hand again, then fold the join back and up under the other lines. Push the knot off your hand and tighten. To finish the knot, release the temporary join.
11. Carrick Bend
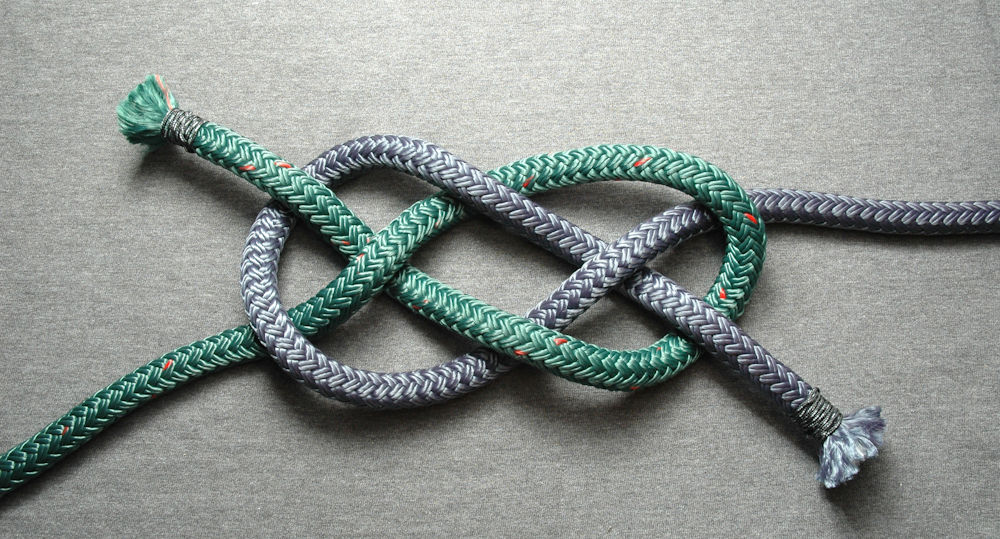
Photo credit to David J. Fred, Wikipedia
The Carrick bend is used for joining two ropes together, and works especially great with large, stiff ropes. Characterized by it’s tidy, interwoven appearance, this knot is a great solution for a load-bearing bend that can be easily untied when no longer needed. Even under a significant load or soaked in water, this bend will not jam, making it ideal for boating.
How to Tie a Carrick Bend
With one line, form a loop with the working end under the standing end. Pass the line under the loop of the other line and then over and under. Thread the working line across the loop passing under itself. To finish, pull both standing ends to tighten the knot.
The number of knots, bends and hitches out there is staggering. We narrowed it down to these nine sailing knots since they’re all simple to master and have many practical applications for boating. If you’d like to learn more, we recommend visiting Animated Knots for a complete list of knots used in yachting.
At Van Isle Marina, we are Western Canada’s exclusive authorized dealers for top of the line Pursuit boats. If you’ve been considering upgrading your boat, browse through our wide selection of new and used yachts and boats or contact our team of expert yacht brokers to find the perfect model for your lifestyle.